Like most editors of 3D graphics, Esquimo also has a virtual cameras. Their use is not necessary, although very useful in many cases. It is possible to render any view. Static views (Top, Bottom, Left, Right, Front, Back, User, Perspective) are often sufficient for very simple scenes, such as:
single rotating object or few objects but with a fixed observer's position. In other cases, cameras will be very helpful.
Free Camera
 It functions as a single object (observer), which can change position and orientation (angular position). The setting of this camera in a new frame creates a maximum of 2 key components on the timeline – the position and rotation. The only parameter for this type of camera is the
Field of View.
It functions as a single object (observer), which can change position and orientation (angular position). The setting of this camera in a new frame creates a maximum of 2 key components on the timeline – the position and rotation. The only parameter for this type of camera is the
Field of View.
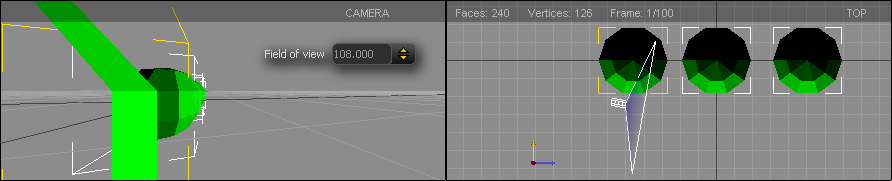
Too large values of FOV can cause lacks in the sides of the camera frame, especially when the camera is very close to the object. Therefore, at high values of FOV it is better to test the animation more thoroughly, especially in those passages where the camera is close to the geometric objects.
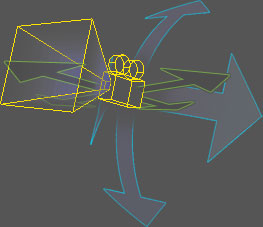
Target Camera
 It consists of two objects: observer and target. In each frame, the setting of the camera creates a maximum of three key components:
- position of the target
- position of the observer
- rotation of the observer
Similarly as in the case of the Free Camera it has only one parameter - the
Field of View.
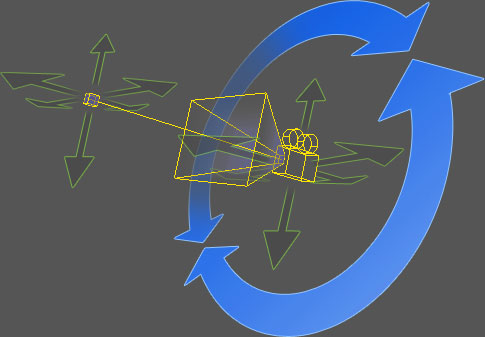
The choice of camera depends on the nature of its work. For the purpose of encirclement (such as a helicopter’s flight around a group of cubes) it will be more convenient to use the
Target Camera. While moving the camera on a flat terrain such as map, it would be better to make a use of the Free Camera, unless there is a need to change the viewing angle. The truth is, that there is no strict rules and the choice of camera is only a matter of convenience and preference of the user.
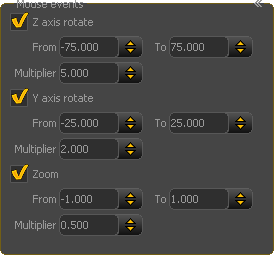 Target Camera enables basic interaction of the user via mouse events. It will be useful for example if you wanted to give the user the opportunity to independently look at the object from different sides. Two axes of traffic plane of a mouse and pass of a mouse wheel can be coupled with the movement of the observer around the target. Accordingly:
- movement along X axis (2D - screen coordinate) corresponds to the rotation of the camera in a
horizontal plane (rotation around the Z axis)
- movement along Y axis (2D - screen coordinate) corresponds
to the rotation of the camera in a vertical plane (rotation around
the Y axis)
- roll of a mouse wheel zoom in/ out the camera (of observer) from the target
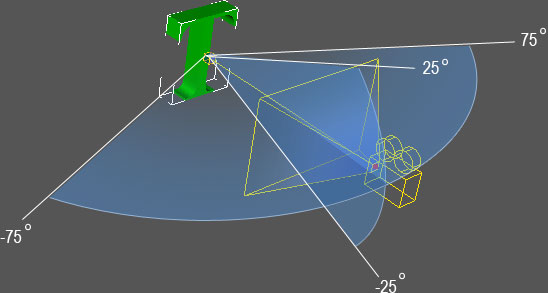
Range of movement in each axis is limited by the values of:
From, to. Transition of camera’s movement in relation to the mouse movement is given by the
Multiplier. The closer the mouse is located to the edge of the screen animation,
the faster is the movement of the camera. The work of the camera for the values given in the figure are shown in the example below:
 |
|
| Move the mouse on the object below in order to see the Target Camera with the
Mouse Event turned on in the action for the sample values shown in the figure
above. |
|
|
Photo Target
 These
are the static cameras. They are used only for setting the position in
which the main camera (the one that animate) is set up after clicking on
an object in the scene. One can set many such cameras in the scene. As
many cameras of the Photo Target there are in the scene, as many presets
of position you can assign in a response to the Mouse Click event. In
action it looks as follows: when the animation is played and the user
clicks on a specific object, the scene stops playing, and in a response
the camera moves to the selected preset position. Of course, the object
has to be already prepared for it. This involves, in principle, only the
activation for the object of event – Mouse Click – and selection of
Photo Target as a response to the
event. Then, in the event properties, you need to choose one of the
Photo Target cameras, the same way defining the position to which
the main camera will move after clicking on this object. For more about
the defining events for each objects see Events section.
These
are the static cameras. They are used only for setting the position in
which the main camera (the one that animate) is set up after clicking on
an object in the scene. One can set many such cameras in the scene. As
many cameras of the Photo Target there are in the scene, as many presets
of position you can assign in a response to the Mouse Click event. In
action it looks as follows: when the animation is played and the user
clicks on a specific object, the scene stops playing, and in a response
the camera moves to the selected preset position. Of course, the object
has to be already prepared for it. This involves, in principle, only the
activation for the object of event – Mouse Click – and selection of
Photo Target as a response to the
event. Then, in the event properties, you need to choose one of the
Photo Target cameras, the same way defining the position to which
the main camera will move after clicking on this object. For more about
the defining events for each objects see Events section.
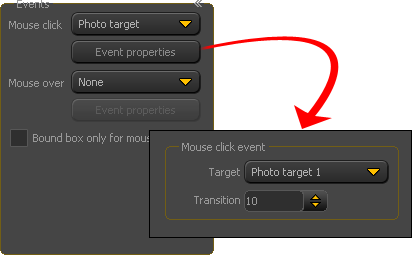
Additionally, you can specify the transition time of moving the main camera to the desired position, measured in frames.
Important!
Cameras of Photo Target type act as predefined position of
animated camera. If you want to use them, you have to put in the scene at
last one camera of Target Camera type.
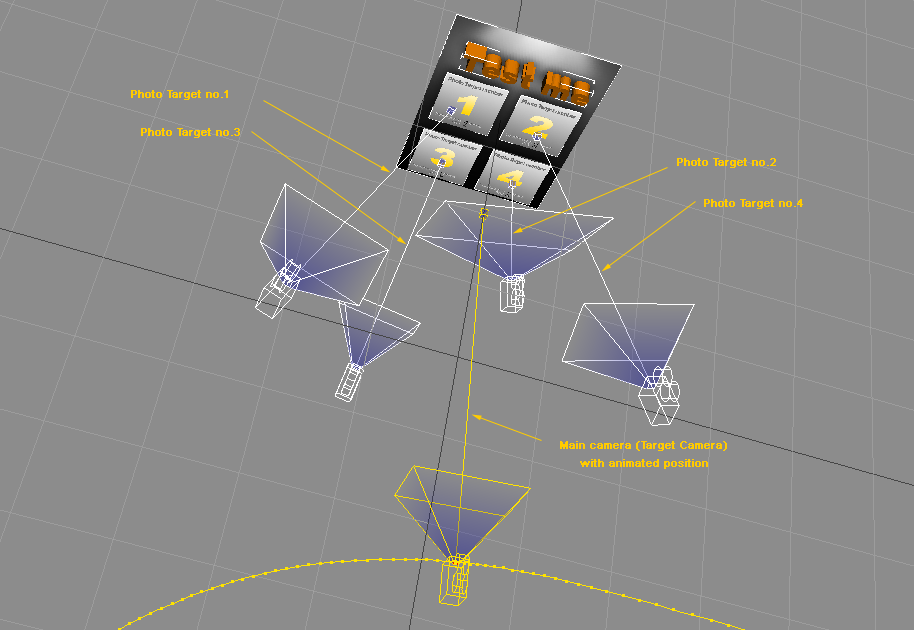
Let’s try to build a simple scene, using the Photo Target camera. Create a base object –
Textured Plane – in front of which you will place other objects. For educational purposes, I used the previously prepared textures, but in practice you may as well use the objects without textures, such as an ordinary Plane, or substantially any other objects. As an exercise, try to make possibly a similar scene to that shown in the figure below. At this stage, do not pay attention to all the parameters given in the figure, some of them will be explained later.

 Create a camera of
Target Camera type and insert it so that it “looks” at the objects from the front. You can gently animate its trajectory, though it is not necessary. Then, create 4 cameras of
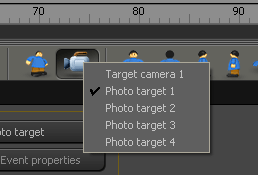
Photo Target type and set it more or less as shown in the figure below. It is about the fact, that each of these cameras was focused on its object in a different way. In order to conveniently adjust the position of each
Target Photo, it is best to set one of the four views as the view of the camera and the others differently, to be able to freely manipulate the camera position. You have to remember that the view of the camera concerns the right one. You can choose to view one of the cameras available at the scene by clicking the right button of the mouse on the icon of
Camera View.
Create a camera of
Target Camera type and insert it so that it “looks” at the objects from the front. You can gently animate its trajectory, though it is not necessary. Then, create 4 cameras of
Photo Target type and set it more or less as shown in the figure below. It is about the fact, that each of these cameras was focused on its object in a different way. In order to conveniently adjust the position of each
Target Photo, it is best to set one of the four views as the view of the camera and the others differently, to be able to freely manipulate the camera position. You have to remember that the view of the camera concerns the right one. You can choose to view one of the cameras available at the scene by clicking the right button of the mouse on the icon of
Camera View.
As you can see here, for each object you can set the time of camera movement in predefined position,
entering the number of frames. In the example prepared below, for each object I set a different time of transition, so you can see the
difference.
Photo Target smoothly changes both - the camera position and Field of view (FOV pparameter). For Photo Target 3 and 4 I set a different FOV than default one (30). For each of the cameras (at the level of the camera, not the object) I also turned on the mouse event, so when you click on the object the camera approaches to it and you can move the mouse by changing position of the camera in the orbital motion around the camera.
Move the mouse over the image below to activate the animation, then click on the one of objects with texture of the
digit. Clicking on the same object a second time will cause that the main camera returns to the normal operation. You can also move directly between positions of Photo Target. Being in close, try to click on adjacent objects.
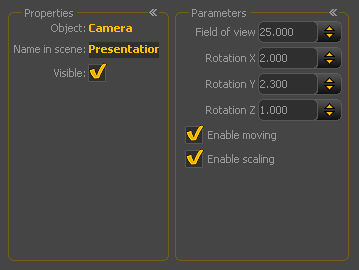
Presentation camera
By using this camera you can easy create an SWF animation that allows to manipulate the view with mouse. Very useful when you want to show a 3d object and give to user a possibility of viewing it at various angle.
To see your scene from Presentation camera
mode just add it to the scene and set its position so that the camera is
facing the object which is going to be presented. Make sure the
Presentation camera view is active when you publish the scene.
Published SWF shows the object in motion as if it is spinning around own
axis. In fact the camera is moving around its target. Once you click on
the movie area camera stops and you take control over the view:
- drag&drop rotates the camera
- CTRL + left mouse button moves the camera, cursor
keys can do it as well
- mouse scroll wheel zoom in/out the view ( works well only in the
pop-up widows, if the SWF is embedded on the webpage mouse wheel will
scroll the page )
- SPACE - restart initial rotation
If you go to
Presentation camera option you can a group of parameters that set a speed of initial rotation.
There are also options to set field of view the camera here. If you
don't want the camera moving as the SWF starts unmark relevant
checkboxes.