Esquimo is equipped with API, thank to which there is a possibility of communication between the parent SWF and the dynamically loaded SWF, generated in Esquimo. The are two ways of using Esquimo output files with actionscript 3 depending on the objective. You may want to either:
1) load Esquimo SWF as a child into your main parent movieclip - this option is pretty easy and used when you don't need to access API functions neither manipulate with scene data on deeper level. It mostly applies when you need just display output SWF created in Esquimo within other SWF.
or
2) control the esquimo animation in details with use of API commands. In this case you will use "Publish SWC" option in Esquimo editor which exports package of necessary files targeted for developers. The bunch of files includes scene data and general animation settings, table of all scene elements ID defined as CONSTs in seperate .as file and most important - .swc file providing all necessary class library and data that enable using code completion facility for Esquimo API commands.
1) Simple loading Esquimo SWF into parent SWF.
All you need to do is just create SWF file in Esquimo editor (top bar menu : File -> Publish) and save it in the location you can access from your parent SWF. The required AS3 code is simple and is all about loading the SWF file and cast it to MovieClip.
Main.as
			package
			{
				import flash.display.Loader;
				import flash.display.MovieClip;
				import flash.display.Sprite;
				import flash.events.Event;
				import flash.net.URLRequest;
				import org.flashdevelop.utils.FlashConnect;

				public class Main extends Sprite
				{
					private var esquimoSWFLoader:Loader;
					private var esquimoSWF:MovieClip;

					public function Main():void
					{
						if (stage) init();
						else addEventListener(Event.ADDED_TO_STAGE, init);
					}

					private function init(e:Event = null):void
					{
						removeEventListener(Event.ADDED_TO_STAGE, init);
						var myurl:URLRequest = new URLRequest("myLib/esquimo_animation.swf");
						/*
						 * if you work locally, try to place your loaded esquimo SWF file in the same or deeper level
						 * in relation to main output SWF. Otherwise you might come across the error of "Security sandbox violation".
						 * In that case you might need to designate the folder that the loaded SWF is held in as "trusted".
						 */
						esquimoSWFLoader = new Loader();
						esquimoSWFLoader.contentLoaderInfo.addEventListener(Event.COMPLETE, esquimoSWFLoader_complete);
						esquimoSWFLoader.load(myurl);
					}

					private function esquimoSWFLoader_complete(e:Event):void
					{
						esquimoSWF = MovieClip(esquimoSWFLoader.content);
						addChild(esquimoSWF);
					}

				}

			}
2) Handling Esquimo animation with use of API commands.
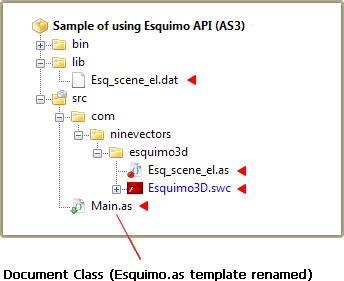
If you want to use API with Esquimo animation you have to export set of dedicated files for the particular scene. Use the "Publish SWC" option (top bar menu : File -> Publish SWC or press F12) to export the set of files which includes:
- Esquimo3D.swc - contains, among others, library of API commands and definitions for code-completion.
- Esquimo.as - code template that attach necessary files to the project and initialises the Esquimo engine. It might act as a Document Class.
- yourscenename.dat - this small file contains information about elements used in editor (created geometry, surfaces, light, cameras) as well as animation data (set of keys placed in timeline).
- yourscenename.as - table of relations ID -> CONST, where ID is an ID number of element used in Esquimo editor and CONST is a relevant string that can be used interchangeably. When you create a new object in Esquimo editor an ID number is given automatically. Using it in your AS3 project will be akward in major cases. It is much easier to work with user friendly names, especially with code-completion support. Sample entry looks like : public static const SURFACE_7:uint = 0xc00007;. You will be asked for the name of the file while exporting.
As for table of ID consts (yourscenename.as) you can save it anywhere you want to (Esquimo places it in src/com/ninevectors.esquimo3d directory by default in exported pack). You can move into other location if you need. Alike yourscenename.dat might be stored anywhere (default export location is: /lib directory).
The following example shows how to start in order to gain control over exported Esquimo scene by API commands. Actually most of the job is done as the starting code for Document Class is included in exported Esquimo.as file. All you need to do is modify default paths to exported files and rename Document Class main function name if needed. The diagram below shows a default deployment of files exported with "Publish SWC" function.
In the example below there is an extra piece of code to show where and how you can start using Esquimo API after the engine is initialised.
Main.as
			package
			{
			    import flash.events.Event;
			    import flash.utils.*;
			    import flash.system.*;
			    import flash.display.*;
			    import flash.geom.Point;
			    import flash.events.*;
			    import com.ninevectors.esquimo3d.NEsquimo3D;
				import com.ninevectors.esquimo3d.Esq_scene_el;

				[SWF(width = "800", height = "500", backgroundColor = "#000000", framerate = "60")]
			    public class Main extends MovieClip
			    {
					[Embed(source = "../lib/Esq_scene_el.dat", mimeType = "application/octet-stream")]
			        private var scene:Class;

			        private var m_esquimo:NEsquimo3D;

					//---------- variables required only for example demonstration --------------
					private var rotatingObjects:Array;
					private var movingLights:Array;
					private var counter:Number;

					//--------------------------

			        public function Main()
			        {
			            addEventListener(Event.ADDED_TO_STAGE, addedToStageEvent);
			        }
			        private function addedToStageEvent(e:Event):void
			        {
			            removeEventListener(Event.ADDED_TO_STAGE, addedToStageEvent);
			            stage.scaleMode = StageScaleMode.NO_SCALE;
			            stage.align = StageAlign.TOP_LEFT;
			            stage.focus = this;

			            m_esquimo = new NEsquimo3D(this);

			            m_esquimo.addEventListener(NEsquimo3D.STAGE3D_INITIALIZATION_FINISHED, Stage3DInitializationFinished);
			            m_esquimo.InitializeStage3D();
			        }
			        private function Stage3DInitializationFinished(e:Event):void
			        {
			            m_esquimo.removeEventListener(NEsquimo3D.STAGE3D_INITIALIZATION_FINISHED, Stage3DInitializationFinished);
			            m_esquimo.addEventListener(NEsquimo3D.SET_SCENE_FINISHED, SetSceneFinished);
			            m_esquimo.SetScene(new scene());
			        }
			        private function SetSceneFinished(e:Event):void
			        {
			            m_esquimo.removeEventListener(NEsquimo3D.SET_SCENE_FINISHED, SetSceneFinished);
			            m_esquimo.addEventListener(NEsquimo3D.INITIALIZATION_FINISHED, InitializationFinished);
			            m_esquimo.Initialize();
			        }
			        private function InitializationFinished(e:Event):void
			        {
			            m_esquimo.removeEventListener(NEsquimo3D.INITIALIZATION_FINISHED, InitializationFinished);
			            //################################
			            //here is the end of initialization
			            //################################

						//here is where your fun starts. let's test some API instructions
						rotatingObjects = [];
						counter = 0;
						var rotObj:Object = { };
						rotatingObjects.push(initObject(Esq_scene_el.DOTTED_SPHERE, 1));

						var boxSide:Number = 0.025;
						var boxRowAmount:uint = 10;
						var DeployStartPos:Number =  -0.5 * ((3 * boxRowAmount) - 1) * boxSide;
						for (var i:uint = 0; i < boxRowAmount; i++) {
							for (var j:uint = 0; j < boxRowAmount; j++) {
								var newBox:uint = m_esquimo.GeometryCreateBox(Esq_scene_el.SURFACE_2, boxSide, 1, 0);
								m_esquimo.SetGeometryPosition(newBox, DeployStartPos + 3 * j * boxSide, DeployStartPos + 3 * i * boxSide, 0);
								rotatingObjects.push(initObject(newBox, 10));
							}
						}

						movingLights = [];
						movingLights.push(initObject(Esq_scene_el.POINT_LIGHT_1, 4));
						movingLights.push(initObject(Esq_scene_el.POINT_LIGHT_2, 4));
						movingLights.push(initObject(Esq_scene_el.POINT_LIGHT_3, 4));

						m_esquimo.addEventListener(NEsquimo3D.FRAME_RENDERED, m_esquimo_frameRendered);

			        }

					private function m_esquimo_frameRendered(e:Event):void
					{
						counter += 0.05;
						var curOb:Object;
						for (var i:uint = 0; i < rotatingObjects.length; i++) {
							curOb = rotatingObjects[i];
							m_esquimo.AppendGeometryRotationMatrixX(curOb.id, curOb.XrotSpeed * Math.sin(curOb.Xoffset + counter));
							m_esquimo.AppendGeometryRotationMatrixY(curOb.id, curOb.YrotSpeed * Math.sin(curOb.Yoffset + counter));
							m_esquimo.AppendGeometryRotationMatrixZ(curOb.id, curOb.ZrotSpeed * Math.sin(curOb.Zoffset + counter));
						}

						for (i = 0; i < movingLights.length; i++) {
							m_esquimo.SetLightPosition(
								movingLights[i].id,
								movingLights[i].XrotSpeed * Math.sin(movingLights[i].Xoffset + counter),
								movingLights[i].YrotSpeed * Math.sin(movingLights[i].Yoffset + counter),
								movingLights[i].ZrotSpeed * Math.sin(movingLights[i].Zoffset + counter)
							)
						}
						m_esquimo.SetLightPosition(Esq_scene_el.POINT_LIGHT_1, 10, 20, 10);
					}

					private function initObject (objectEsquimoID:uint, rotSpeed:Number):Object
					{
						var obj:Object = { };
						obj.id = objectEsquimoID;
						obj.XrotSpeed = rotSpeed * Math.random();
						obj.YrotSpeed = rotSpeed * Math.random();
						obj.ZrotSpeed = rotSpeed * Math.random();
						obj.Xoffset = 2 * Math.PI * Math.random();
						obj.Yoffset = 2 * Math.PI * Math.random();
						obj.Zoffset = 2 * Math.PI * Math.random();
						return obj
					}
			    }
			}
And this is how the IDs of used scene elements are linked to relevant CONSTs. In this example the file was given a name Esq_scene_el.as while exporting.
Esq_scene_el.as
			package com.ninevectors.esquimo3d
			{
				public class Esq_scene_el
				{
					public function Esq_scene_el()
					{
					}

						//
						// SURFACE
						//

						public static const SURFACE_1:uint = 0xc00001;
						public static const SURFACE_2:uint = 0xc00002;
						public static const SURFACE_3:uint = 0xc00003;

						//
						// TEXTURE
						//


						//
						// GEOMETRY
						//

						public static const DOTTED_SPHERE:uint = 0x1;

						//
						// GROUP
						//


						//
						// CAMERA
						//

						public static const PRESENTATION_CAMERA_1:uint = 0x600001;

						//
						// LIGHT
						//

						public static const POINT_LIGHT_1:uint = 0x400001;
						public static const POINT_LIGHT_2:uint = 0x400002;
						public static const POINT_LIGHT_3:uint = 0x400003;
				}
			}
equivalent of m_esquimo.GeometryCreatePlane() is Esquimo3DGeometryCreatePlane.
Also, in this case code-completion for Esquimo API commands don't work.
Available API commands are divided into particular sections. Select a section to see detailed descriptions.