Presentation of 3D object on the website. "Presentation" camera in Esquimo.
In this tutorial I'd like to show you usage of special type of camera from Esquimo called "Presentation". Using this camera allows user to manipulate the view in the output SWF. You can rotate, zoom in/out and translate the camera using mouse. Such SWF gives a possibility of looking at te object at any angle which migt be very handy when you want to present any 3D object on the website. The whole process is very simple. Create or import a 3D object , add "Presentation" camera to the scene and export SWF (File/Publish). That's it. What is the tutorial for then ? I'd like to show you a sample workflow of building a webpage than presents a joystick.
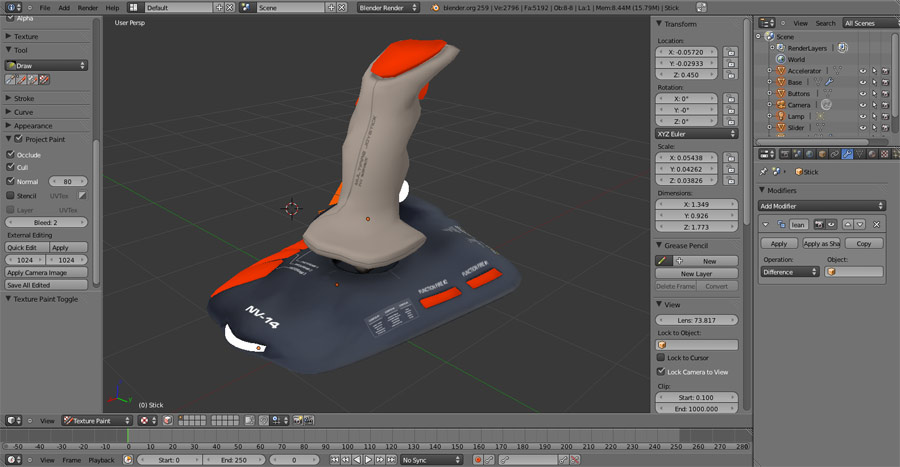 I've created and textured the joystick in Blender - open source
application for 3d creation, which is great by the way. I'm not going to
cover entire process of creation the model as there are a lot of
tutorials for Blender and I think Blender experts can do it better. I
find Blender very convenient in preparing textures. First I've applied
solid colors for the base, stick and buttons and baked 3 separated
textures rendering scene with ambient occlusion lightning. Then I've
made several corrections in Photoshop using projection painting
technique. As the result I got 8 elements textured with 3 jpgs. If you
have a Blender you can check it out.
I've created and textured the joystick in Blender - open source
application for 3d creation, which is great by the way. I'm not going to
cover entire process of creation the model as there are a lot of
tutorials for Blender and I think Blender experts can do it better. I
find Blender very convenient in preparing textures. First I've applied
solid colors for the base, stick and buttons and baked 3 separated
textures rendering scene with ambient occlusion lightning. Then I've
made several corrections in Photoshop using projection painting
technique. As the result I got 8 elements textured with 3 jpgs. If you
have a Blender you can check it out.
Adding Presentation Camera
If you downloaded above package you will find 3ds folder which contains all the files that we gonna import into Esquimo.Launch Esquimo and import the joystick model. Select Create/Geometry/Import geometry from main menu or select appropriate icon in Geometry tab and select blend_joy.3ds file. Remember that the textures of the model should be placed in the same directory if you want them to be applied automatically. Of course you can still manually assing textures to particular elements after importing the model. The sample model has a small size comparing to initial dimensions of the Esqumio scene. Therefore rescale it during importing.
Esquimo will ask you if you want to use "Adobe" renderer. Select "yes" because this is the only mode that displays textures in current version (1.1) . You can eleminate some of displaying artefacts changing Face sort parameter in Properties container to "Near-Z". Problem of Z-sorting will be gone in next gen of Flash Player - Molehill.
Change the screen size of generated SWF to 400x400px (go to Scene tab and set Width and Height values) and set Background color to #1B1D20. Add the Presentation camera to the scene.

Place the camera so that the camera's target is set in the center of the joystick and the camera next to it. Set one of the four views to CAMERA view (ALT+C). Make sure that "Show rendering region" (Tools->Options) checkbox is on. Place the camera in position so that the joystick will fit the frame of rendering region. More or less as shown below.

Now, you can test the scene (F5). The Presentation camera has given the initiall orbital motion. Untill you click on the SWF area the camera is moving aroung its target and it looks like the joystick is rotating. After first click on the SWF area the movie switches to manual mode in which you can rotate the view using drag&drop, move it holding CTRL and zoom in/out with mouse wheel. If you go to Presentation camera options (select it by clicking the camera in the scene or in the Scene element list) you can set parameters of initial motion.
Adding interaction
There are two ways of adding interaction to the SWF movie generated by Esquimo: enabling built-in events to particular elements and using API. Both can be used simultaneously
Using Esquimo's built-in events
I'd like to show all the controls of the joystick. I'm going to set event handling for these particular elements.

Select top button, expand its Events container and define a response for the event when mouse is moving over the button. Let's move the button up a little bit each time when mouse is over its. I used values as on the picture below.

- Use bounding boxes for events detecion to save CPU usage but only when bounding boxes of elements with defined events don't overlap.
- To preview bounding boxes of series of elements simply select them. A yellow frame will mark the volume of bounding box for each element.
Define the events for all other buttons. Let each of them move after mouse will move over. Let other 2 elements ( throttle lever and wheel in front of the joystick ) rotate. Two rotating elements of joystick don't have point situated in the right place by default. You need to adjust pivoit point position to get the rotation more natural looking. First move the pivot point of the wheel as it is shown on the picture below. The "Base" object might interrupt, turn it off for a moment.

Now assign an Mouse over event handling. Go to Events
container and set Mouse over (drop down list) to
"Rotate"
and in Event properties set Z
value to 15.
Add event handling to the "Throttle lever" alike. Its pivot point is also
located in wrong place just after importing. Move to more or less to the
position as it shown on the screen below.

Set following parameters in Events container of "Throttle lever".
- Mouse over: Rotate
- Event properties: Z: -25.00
- Event properties: Tween:
Ease in
Custom AS3 events with using API
Once you finished setting events in Esquimo publish the SWF file (F12 key). Name the published file as joystick.swf. Now we are going to build an SWF which will be embedded on our sample webpage. The joystick.swf file is going to be loaded to the parent SWF as child-movieclip.
I used Flashdevelop 4.0.0RC1 and Flex SDK 4.5.1 to build a final SWF that is going to be embedded on sample website. The goal of ussing additional AS3 code is displaying a short info about the joysticks controller on which the mouse cursor enters. Loaded as a child joystick.swf ( generated by Esquimo ) MovieClip can generate its internal events for particular geometry objects included in the scene. In this case I'm going to use Esquimo3D.MOUSE_OVER / Esquimo3D.MOUSE_OUT events to detect a moment when mouse cursor is over one of the controllers. As a response for the event I will display a text on a transparency bar with short info about pointed element. Don't take this messages seriously. They are only for the tutorial purpose.
If you are not familiar with Esquimo API read at least the part concerning above events here : www.ninevectors.com/manual/06_api.html
The whole project is quite simple and I'm sure you will find your feet in code. You can download the source code here:
I want to focus your attention on the part of code that conerns using Esquimo's events handling:
{
joystickClip.addEventListener("Esquimo3D.MOUSE_OVER", mouseOverHandler);
joystickClip.addEventListener("Esquimo3D.MOUSE_OUT", mouseOutHandler);
}
private function mouseOverHandler(e:MouseEvent):void
{
labelContainer.visible = true;
var whichone:int = e.delta;
switch (whichone)
{
case 11: displayInfo(0); break;
case 12: displayInfo(1); break;
case 6: displayInfo(2); break;
case 8: displayInfo(3); break;
case 7: displayInfo(4); break;
case 1: case 2: case 3: case 4: case 5: displayInfo(5); break;
}
}
Whichone is a variable capturing an ID number of the objects on which mouse cursor entered. The ID number is assigned to the particular geometry object in Esquimo.

Two thing more are worthy of mentioning. After adding loaded Esquimo SWF to the stage you might see unwanted yellow border around its. The line :
fix the problem. When you browse the code you will se that I used third-party library to handle tweens called Acutate. It is much more faster than Adobe tween classes by the way. If you don't have Flash IDE or SWC assets including fl.transition classes you might need any third-party library to handle tweens. Of course only when you need tweens. I used it on my project but you can write an event response function which won't need a tween. It is up to you.