Flash above and under HTML content
As long as you have seen Flash animations on the top of web page content many times, probably you meet Flash under the HTML content less often. Since 9 version of Adobe Flash Player is relased Flash content layering is possible. In this tutorial I'll show you how to embed the SWF file, which is going to be displayed above the DIV with background image and at the same time under top DHTML content. This is what you get after finish this tutorial ( click on the miniature to see the final effect live ).
To finish that tutorial you will need Esquimo and any text editor like Notepad. Of course HTML editor will be fine too.
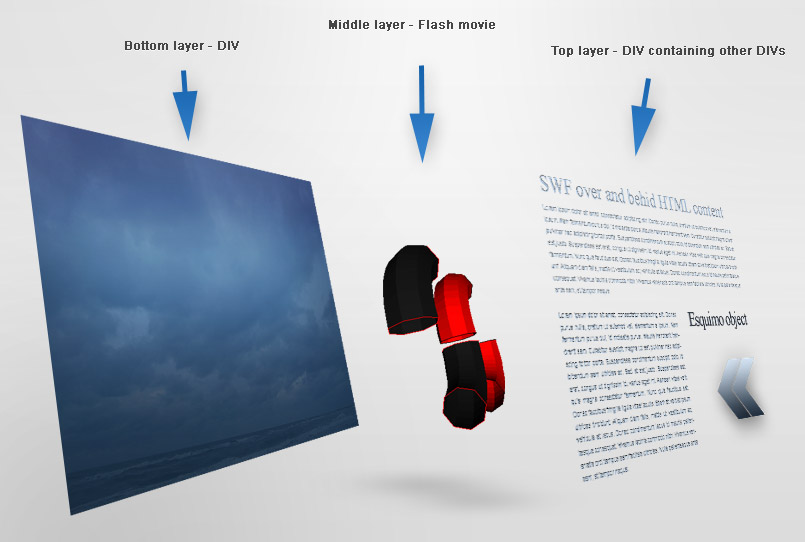
Let's build simple page tha consists of 3 layers:
- background - DIV element with .JPG as a background picture
- 3d flash animation displayed above the the DIV with the background
- and top layer that is going to be a DIV with some DHTML elements (H1, other DIVs) that will cover partially flash animation
Before go start writing DHTML code create a simple animation in Esquimo following the description below. This is the final animation - move mouse cursor over the picture below to see it in motion.
Here are the steps leading to the creation of such animation:
Creating a simple Flash 3D animation in Esquimo
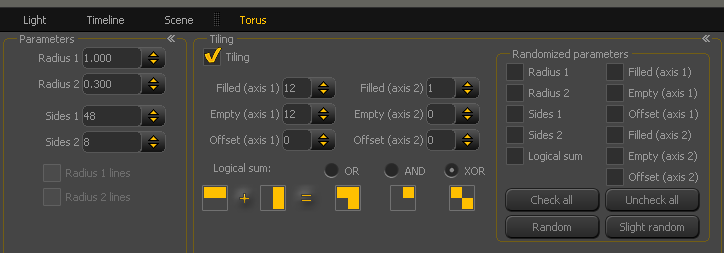
- Create Torus object and set parameters Sides1 = 48 and Sides2 = 8.
- Enable Tiling mode and set parameters of sequence so that the two opposite quadrants will not be draw in the torus,
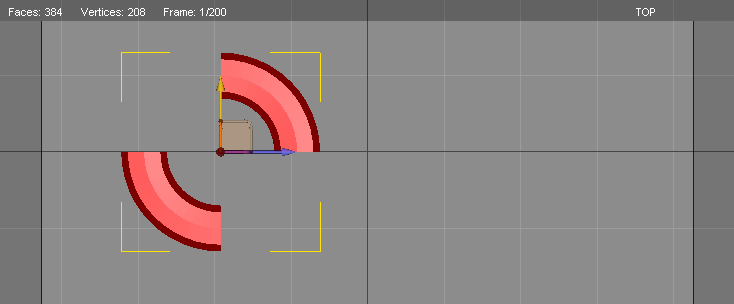
- Zoom out the Top view so you can fit two toruses next to each other and move the view a bit to the left so you can easily set the second torus.
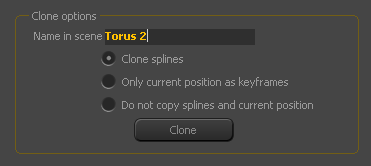
- Duplicate the torus which is in the scene (press CTRL+D
or click the icon). The choice of the option at clonning doesn't matter in this case because there are no any animation keys yet.
Next move the newly formed torus so as to be in contact by cross-sections. The precission is not required here. Try doing this exercise to create an animation as much as posible similar to the one performed for the purpose of this tutorial.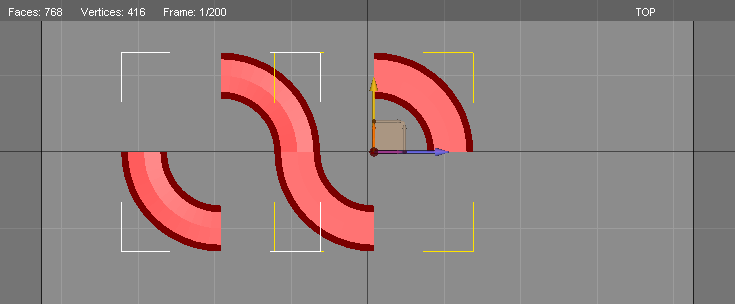
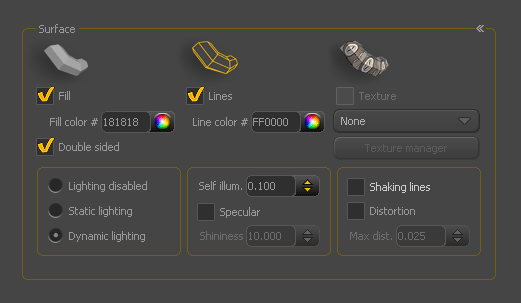
- Now we will change a bit the colors of created objects. Select the torus on the left ( click on it within work area or in Scene element list and go to Surface container
to set its Fill color to #181818 and Line color to #FF0000. Turn off the light shine - Specular checkbox. Turn on line displaying for the torus - Lines checkbox. Turn on displaying of both sides of surface - Double sided checkbox.
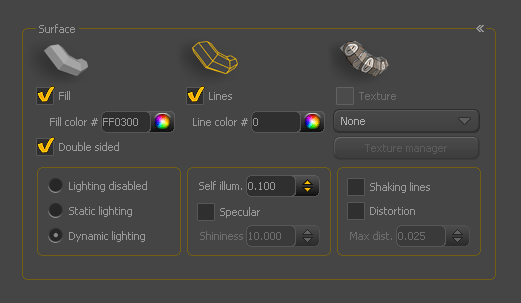
- Set the parameters to the torus on the right as on the image below:
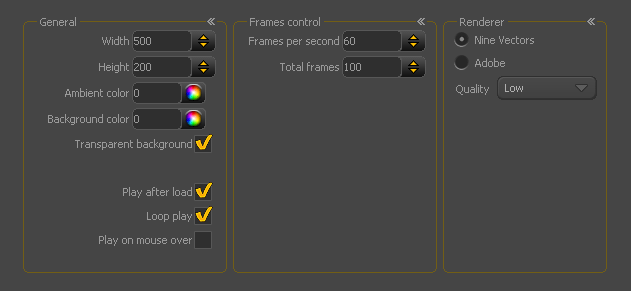
- Ok. Now, let's change basic scene settings. Our animation is preety short i looped, so 100 frames of lenght will be enough. We will set small rendering size so we can afford to set greater FPS - animation will run smoothly. Set Frames per second to 60. Also, select Transparent background checkbox. Obviously we want to make the background behind rotating toruses being visible.
- Now we're going to set our two objects in motion. Select the black torus, make sure you are in first frame and activate rotation mode (press 4 or click the icon ). Create an rotation key - press K or click the icon. Make sure that auto-keyframing mode is on otherwise you need to set the key manually befoer you start the rotation. Go to last frame (SHIFT+]) and rotate the object by 180o counter-clockwise. To provide precise rotation turn on SNAP mode (press S or click the icon ). You also enter exact values to specify amount of rotation - F8 key.
Animate red torus similarly. Select it, go back to first frame (SHIFT+[) and create rotation key. Go to last frame and rotate the object 180o clockwise.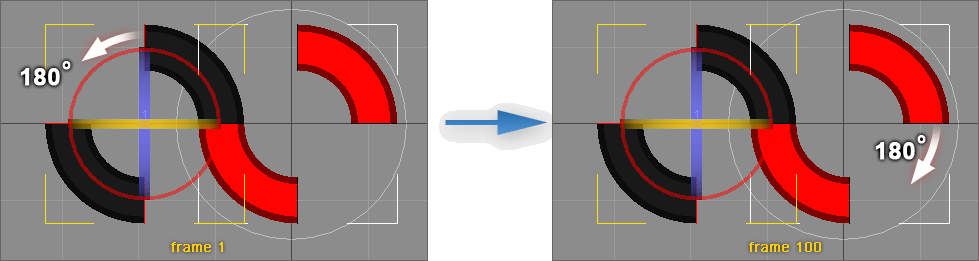
As you can see on the image above the first and the last frame don't differ in appearance to each other. And that's the point. This is the way of making of looped animation, also called "seamless animation".
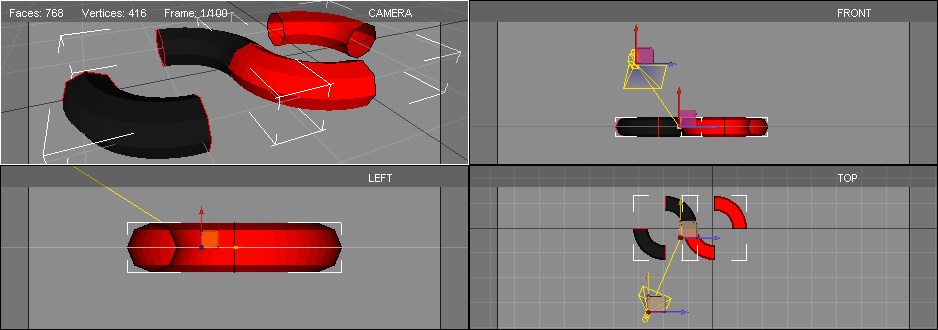
- Insert Target Camera in the scene. Try to set the CAMERA view more or less as on the image below by moving observer and camera target positions. When work area window's aspect ratio is lower than scene aspect ratio ( scene aspect ratio = 500px/200px in our case ) the preview of render area is visible. (You can read more about preview of Rendering region in chapter Publishing of Esquimo manual.) Try to use available render area
by fitting animated objects within rendering boundaries. Press F5 to see on preview if some parts of animated objects goes behind of window preview. If so move the camera to fit whole animation in the rendering region.
- Prepare an empty folder where all needed files will be stored for this tutorial. Enter the folder and make another one called my_media. Now publish the animation created in Esquimo - press F12 (or select appropriate position from main menu). Save output SWF file as toruses.swf in my_media folder.
Well, our simply animation is ready. Let's prepare the HTML code now.
Preparing HTML+CSS
You will need to download bitmap files to finish the tutorial.
Source files (bitmaps, Esquimo scene and HTML+CSS code
The package includes all files of working HTML page, but if you want to train how to assembly the final effect step by step unpack downloaded package somewhere else. You will copy single files to your empty folder during going through the tutorial. I assume you have got some fundamentals of HTML and CSS and I will ommit some basics.
- Create empty text file in you favourite editor and save it as index.html. If you use HTML editor bacis HTML code bacis necessary tags will be placed during creation new HTML file. If you use some simply text editor and have a blank document, insert required HTML tags, as below:
<HTML>
<HEAD>
<BODY> This is where we put our content</BODY>
<TITLE>Flash above and under HTML content - TUTORIAL</TITLE>
</HEAD>
</HTML>
- We will put all CSS styles into separate file and specify its location in <HEAD> section of index.html. At this step we also add a background picture. Add the first <DIV> tag with id="mainBackground".
<HTML>Create another blank text file and save it as my_styles.css. Add the first lines that specify look of the first added DIV with id="mainBackground" and BODY tag.
<HEAD>
<BODY>
<TITLE>Flash above and under HTML content - TUTORIAL</TITLE>
</HEAD>
<LINK href="my_styles.css" rel="stylesheet" type="text/css" />
<DIV id="mainBackground"></DIV>
</BODY>
</HTML>body {padding:0; margin:0; background:#000}Copy bg01.jpg from downloaded package into my_media folder. You should be able to see centered backgound picture like here.
#mainBackground {background:url(my_media/bg01.jpg); width:1280px; height:800px; margin:0 auto}
- Now we will add layer of content. This is the structure of the content layer which we going to fill in the next step. Insert following piece of code into DIV with id="mainBackground".
- Fill empty tags with the content.
Complete code should look like below:
<HTML>Before styling the added content the page will look like here. Let's add some styling. Copy pic01.png into my_media folder and complete CSS stylesheet:
<HEAD>
<BODY>
<TITLE>Flash above and under HTML content - TUTORIAL</TITLE>
</HEAD>
<LINK href="my_styles.css" rel="stylesheet" type="text/css" />
<DIV id="mainBackground">
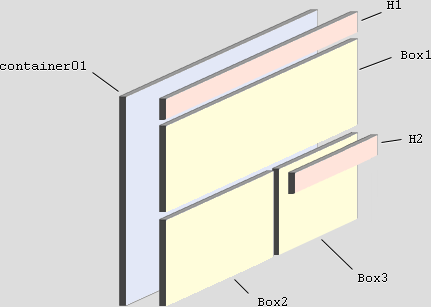
</BODY><DIV id="container01">
</DIV>
<H1 class="textStyle2 shadow1">SWF above and under HTML content</H1>
</DIV>
<DIV id="Box1" class="textStyle1 shadow1">Lorem ipsum dolor sit amet, consectetur adipiscing elit. Donec purus nulla, pretium ut euismod vel, elementum a ipsum. Nam fermentum purus dui, id molestie purus. Mauris hendrerit hendrerit sem. Curabitur suscipit magna ut est pulvinar nec adipiscing tortor porta. Suspendisse condimentum suscipit odio, id bibendum sem ultricies ac. Sed et est justo. Suspendisse est erat, congue ut dignissim id, varius eget mi. Aenean vitae velit quis magna consectetur fermentum. Nunc quis faucibus est. Donec faucibus fringilla ligula vitae iaculis. Etiam et velit et ipsum ultrices tincidunt. Aliquam diam felis, mattis ut vestibulum ac, vehicula at lacus. Donec condimentum lacus id mauris pellentesque consequat. Vivamus lacinia commodo nibh. Vivamus venenatis orci tempus sem facilisis ultricies. Nulla pellentesque ante sem, et tempor neque.</DIV>
<DIV id="Box2" class="textStyle1 shadow1">Lorem ipsum dolor sit amet, consectetur adipiscing elit. Donec purus nulla, pretium ut euismod vel, elementum a ipsum. Nam fermentum purus dui, id molestie purus. Mauris hendrerit hendrerit sem. Curabitur suscipit magna ut est pulvinar nec adipiscing tortor porta. Suspendisse condimentum suscipit odio, id bibendum sem ultricies ac. Sed et est justo. Suspendisse est erat, congue ut dignissim id, varius eget mi. Aenean vitae velit quis magna consectetur fermentum. Nunc quis faucibus est. Donec faucibus fringilla ligula vitae iaculis. Etiam et velit et ipsum ultrices tincidunt. Aliquam diam felis, mattis ut vestibulum ac, vehicula at lacus. Donec condimentum lacus id mauris pellentesque consequat. Vivamus lacinia commodo nibh. Vivamus venenatis orci tempus sem facilisis ultricies. Nulla pellentesque ante sem, et tempor neque.</DIV>
<DIV id="Box3"><H2 class="textStyle2 shadow2">Esquimo object</H2>
</DIV>
</HTML>body {padding:0; margin:0; background:#000}After styling your page should look like here.
#mainBackground { background:url(my_media/bg01.jpg); width:1280px; height:800px; margin:0 auto }
#container01 { width:730px; height:630px; position:absolute; margin:120px 0 0 180px }
h1 { color:#9eb6cf }
h2 { color:#000; height:350px }
.textStyle1 { font:14px/24px Arial, Helvetica, sans-serif; color:#7a9bbd; text-align:justify }
.textStyle2 { font:normal 48px "Times New Roman", Times, serif; margin:0; letter-spacing:-1px }
#Box1 { margin-bottom:30px }
#Box2 { width:400px; float:left }
#Box3 { background:url(my_media/pic01.png) no-repeat 0 80px; float:right }
.shadow1 { -moz-text-shadow: 0px -1px 0px #000; -webkit-text-shadow: 0px -1px 0px #000; text-shadow: 0px -1px 0px #000 }
.shadow2 { -moz-text-shadow: 0px 1px 0px #666; -webkit-text-shadow: 0px 1px 0px #666; text-shadow: 0px 1px 0px #666 }
- Now is the time to add the flash object you created before. We intended to display your esquimo animation between background and content of <div id="container1">. All you need to do is to add another DIV which will contain flash. I've added <div id="myFlash"> before <div id="container1"> on the same DOM level what makes flash displaying under container1. You could also place <div id="myFlash"> after <div id="container1">, but in this case z-index values must be set to both containers to keep desired stacking order. If you have two DIVs on the same DOM level the DIV displayed on the top must have higher z-index than the other DIV.
There are several methods of embedding Flash in a web page. You probably have a favourite one. I've been using simple java script made by Gedi. You can also use any other method ( SWFobject, SATAY, UFO,...) that that allow to set wmode parameter. The script I used has wmode parameter set to window as default what cause displaying of flash on the top. If you want to have it below the content you need to set wmode to opaque or transparent. Opaque makes flash displaying solid background and transparent allow to see HTML behind flash 3d objects within flash rectangle.
Allright, so add the code responsible for displaying Flash.<HTML>and one line more to CSS stylesheet:
<HEAD>
<BODY>
<TITLE>Flash above and under HTML content - TUTORIAL</TITLE>
</HEAD>
<LINK href="my_styles.css" rel="stylesheet" type="text/css" />
<DIV id="mainBackground">
</BODY><DIV id="myFlash">
</DIV><script type="text/javascript">
</DIV>createFlash("my_media/toruses.swf","500","200","#000000","transparent","","id1","myFlash","","");
</script>
<DIV id="container01">
...content...
</DIV>
</HTML>(...)And that's all. This is the final effect.
#myFlash { position:absolute; margin:420px 0 0 460px }